

Getting Race-Ready
by Derek Freathy
"Summer is y-cummin in" and it's time to pull off the dust sheets and get your most rewarding money-pit ready for action again. And while you're changing the fluids and regretting or repairing the depredations of those bloody mice, it's a good idea to check out the important bit that keeps you and the scenery separate.
It's pretty easy to check your tyres, though I've got a few thoughts to share on that later. But what's going on inside the visible part is at least as important. Given a couple of good tyre levers and a decent compressor, it shouldn't take more than 15-20 minutes a corner. You can do it while you're checking the brakes and changing the fluid (you were going to do this anyway, right?).
Start be deflating the tyre, then use two tyre levers to flip the bead over the rim, taking care not to pinch the tube. You'll find this easier if you push the sidewall on the opposite side so that the bead can drop into the well of the rim. Now, continuing to check that you're not trapping the ube under a lever, work around until the front bead is completely outside the rim. You don't need to remove the tyre entirely. For a metal valve, undo the valve retaining nut or ring. For a rubber valve, just push it back through the hole and resolve to get better tubes for this season. Now you can remove the tube. If it sticks, or parts of the rim band (found on wire wheels) come away with it, then both tube and band may need replacement.
Begin by inspecting your tube. Any signs of folding or creasing mean that you've done this inspection just in time - it will fail at some point in the future. And while you're congratulating yourself for your timely intervention, give yourself a bollocking for possibly buying the wrong size tube. Feel all around it for any worn spots. Is the rubber thinner anywhere? Is it uniformly flexible all the way round? If you have any doubts, replace it now. Otherwise you'll be taking the same tyre off again soon, and possibly not just to replace the tube.
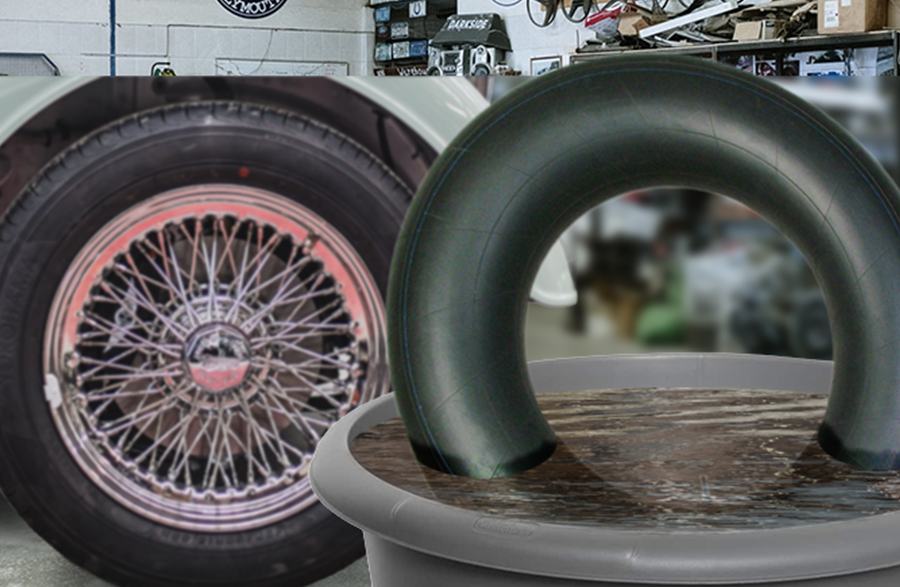
Reinflate the tube just enough to stretch the rubber reasonably taut; there should still be plenty of "give", and then use the same bowl of water you used to use when your bike had a puncture (it doesn't need to be the exact same bowl, because it's either been thrown away or your Mum's still got it). Now check for bubbles, not forgetting to fully immerse the valve; their rubber seals can go hard over time and leak.
Dry the tube carefully and set it to one side. If you have wire wheels, inspect the rim band. This is the vital component that prevents your spokes from burrowing through the tube. The band should be made of dense rubber, not cloth or, perish the thought, layers of insulation tape (yes, we've seen this more times than you'd think). We sell competition-quality rim bands for less than a fiver each, so it's really not worth skimping.
While the tyre is loose, put on a pair of gardening gloves and run your hands around the inside, feeling for any snags or rough edges. If there's anything poking through, and you didn't bother with the gloves, you'll quickly understand why we recommended them. Visually inspect the inside of the tyre and discard it if there's any sign of damage or deterioration.
Before you refit the tyre, inspect it thoroughly, not just for tread depth. Look especially for sidewall cracking. For road tyres, you can also check the date of manufacture by looking for the DOT marking. Look for the letters DOT followed by four digits. The first two show the week number and digits three and four show the year. So 1522 would mean the 15th week of 2022. Beyond five to six years old, tyres are definitely past their best, especially if they've been exposed to sunlight or extremes of temperature. A fresh set at almost certain to improve your lap times as well as your safety.
Making sure that the tube is completely dry, dust it and the inside of the tyre with French chalk (all of our tubes come with a sachet of it for this purpose). This will ease fitting, allow the tube to conform smoothly on inflation, and help prevent adhesion to the tyre between now and your next pre-season inspection. Carefully replace the tube in the tyre, making sure it's not twisted or folded. Secure the valve and inflate the tube a little to help keep it clear from the beads.. Now, pushing the bead into the well on the opposite side to where you're working, lever the bead back inside the rim. Brushing on soapy water makes things easier. Take great care not to pinch the tube as you do so. Once the tyre's in place, check again that there's no tube trapped under the bead and reinflate to pressure.
It's no bad thing to apply a dab of paint across the tyre and rim so that you can see if the tyre has rotated under acceleration and braking. This will save you from torn valves.
An hour checking and replacing as necessary will repay you handsomely in better performance and, hopefully, lower repair bills.